
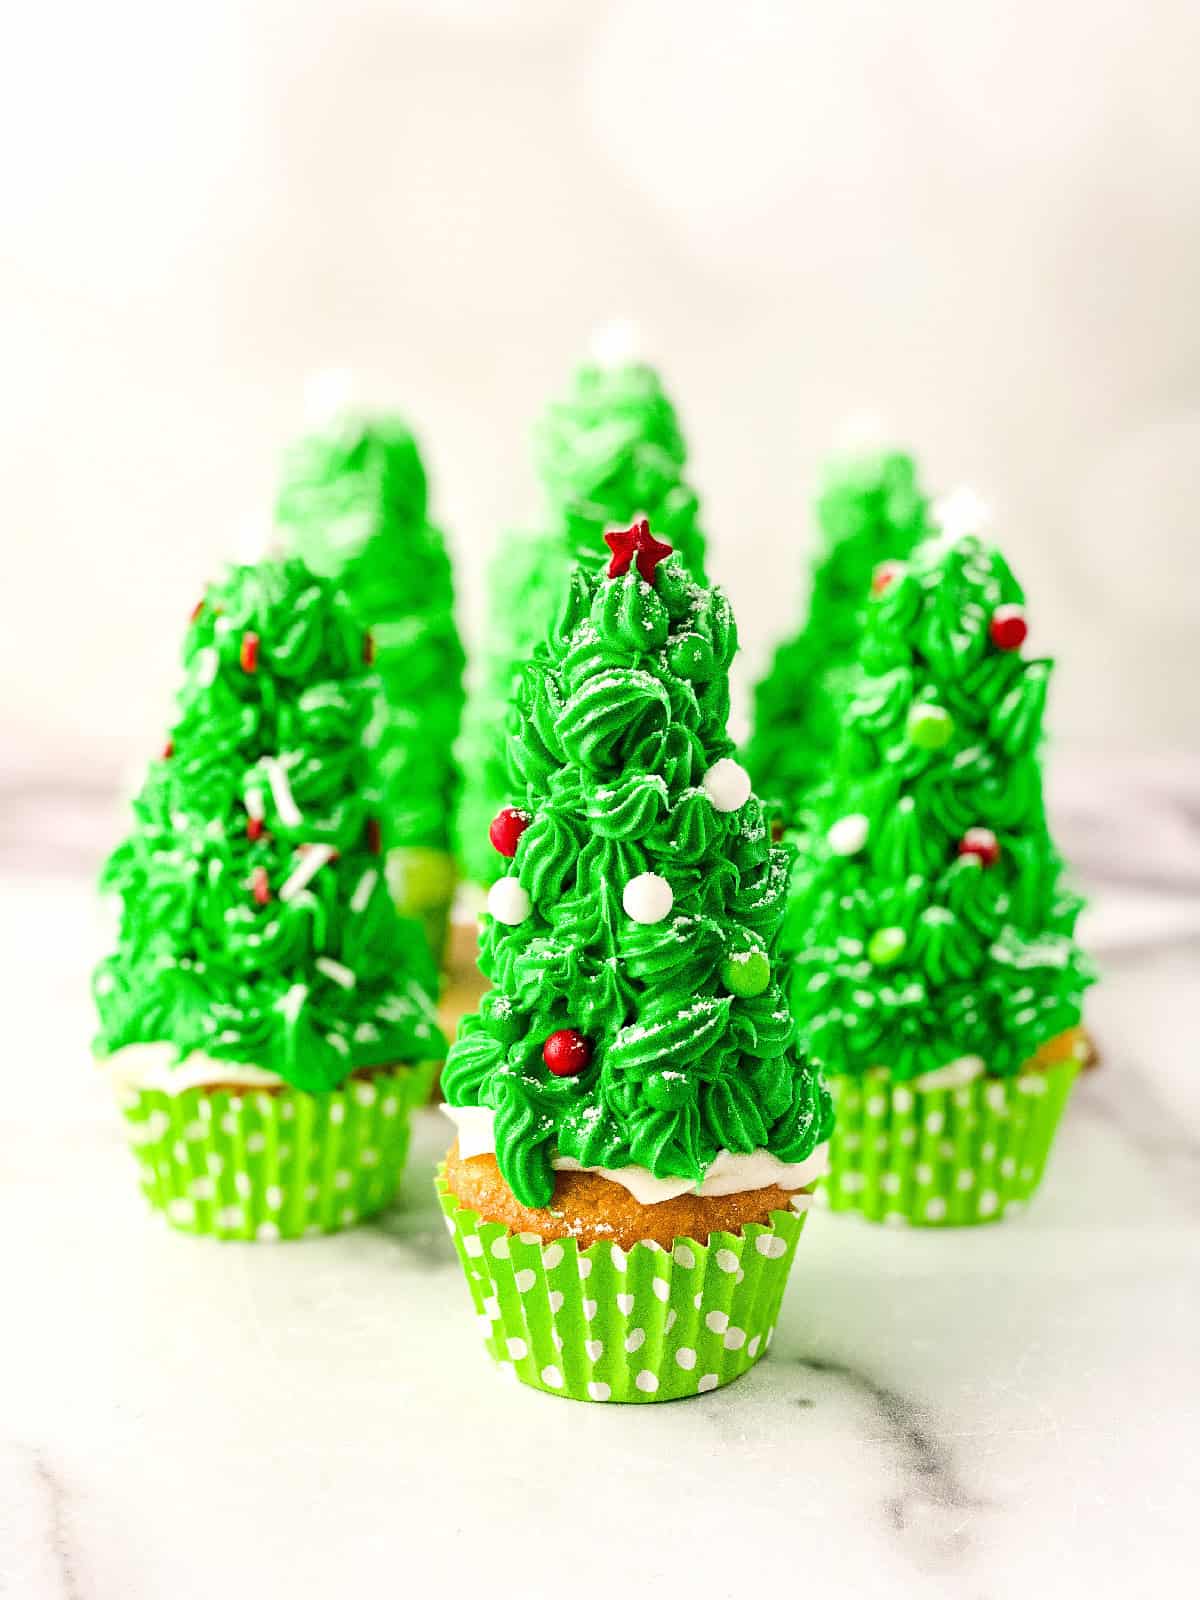
There’s something magical about turning a simple dessert into a festive centerpiece, and these Easydo just do that. With their fluffy cake base, creamy frosting, and cheerful holiday decorations, they’re a fun and delicious way to spread Christmas joy.
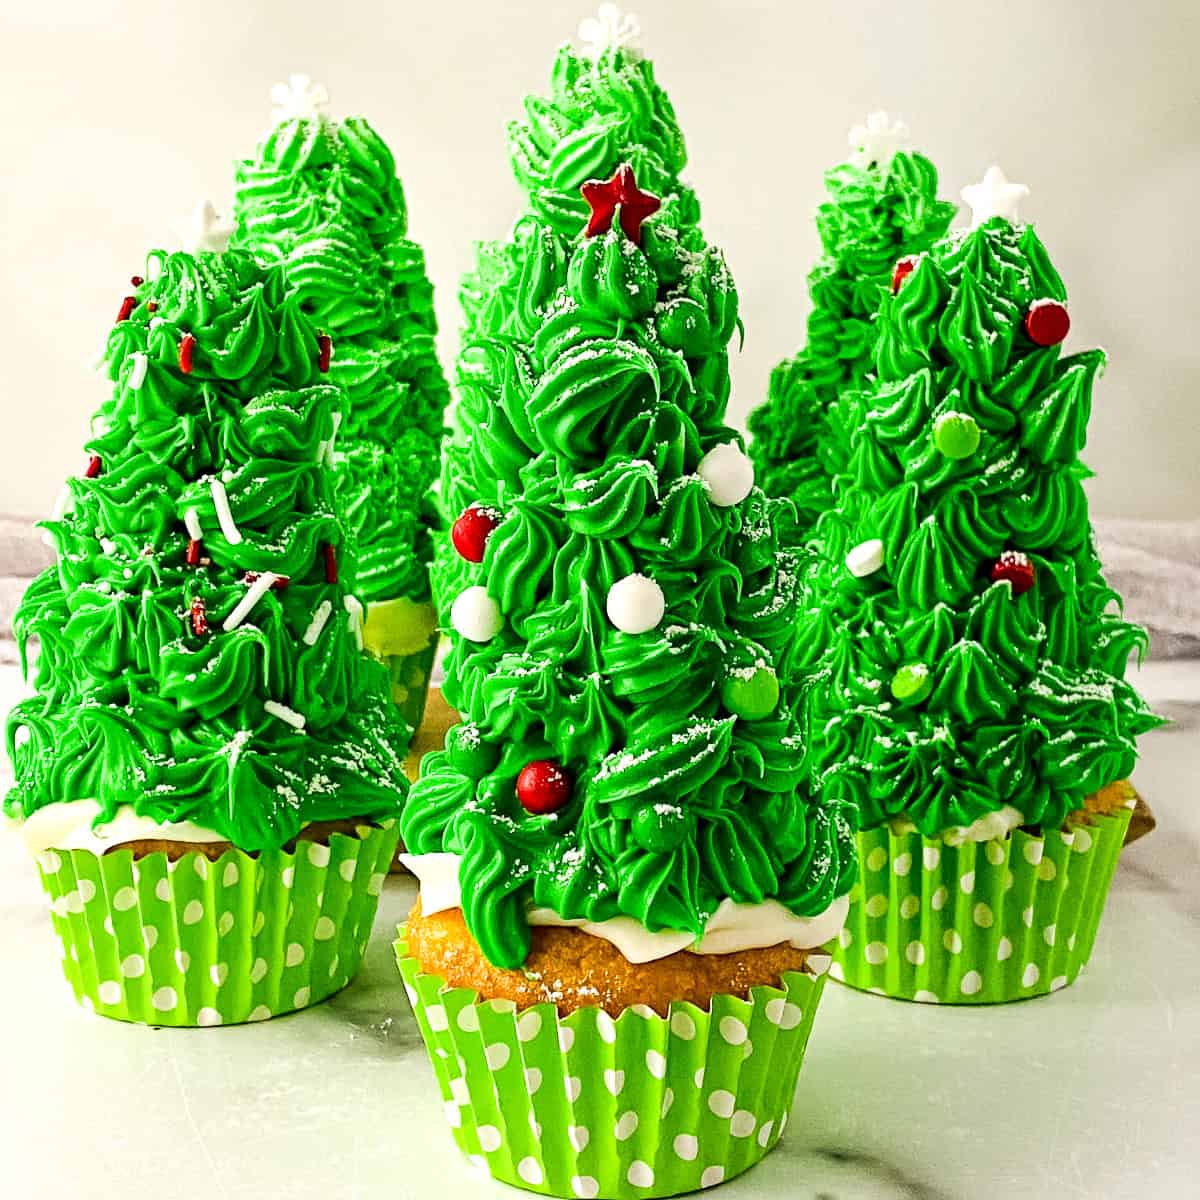
Whether you’re baking them for a holiday party, a classroom treat, or a cozy night at home, these cupcakes are guaranteed to bring smiles and holiday cheer. Plus, they’re easy to make and even more fun to decorate, perfect for kids and adults alike. If you’re looking for a Christmas tree cupcakes recipe, this is a great place to start.
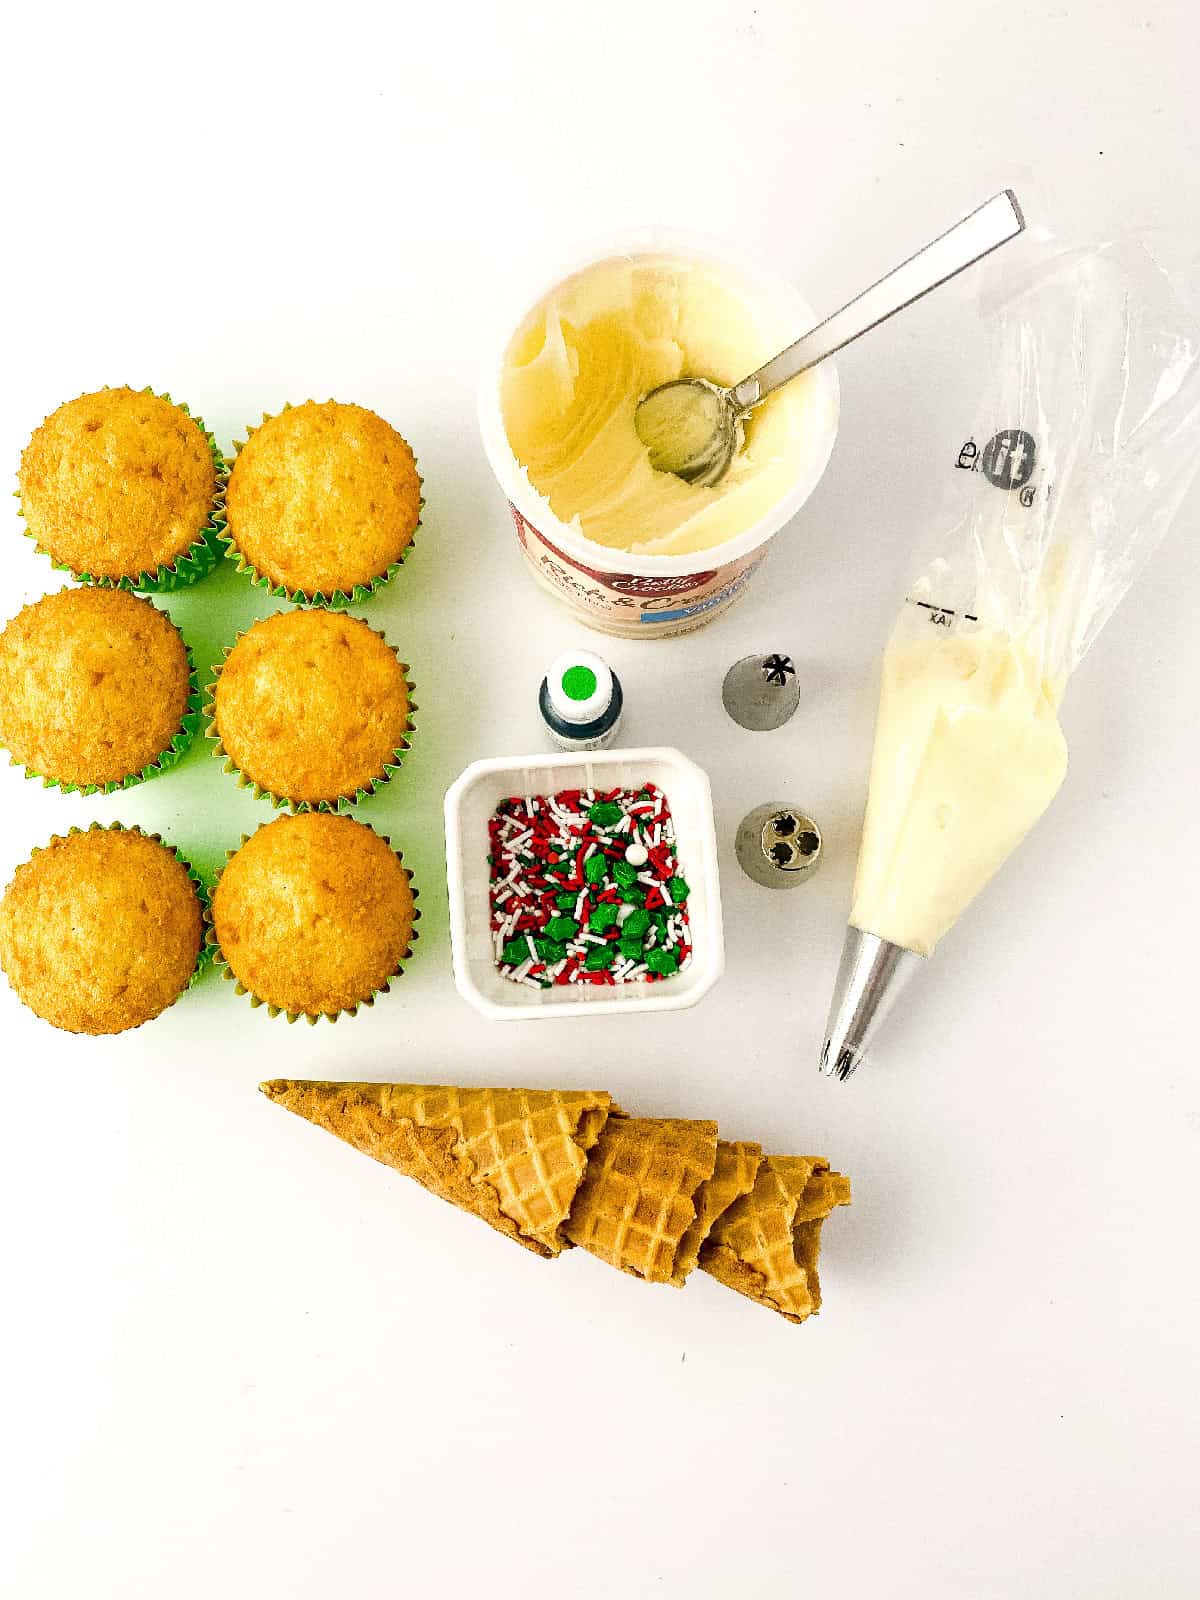
Ingredients for Easy Christmas Tree Cupcakes
You don’t need anything fancy to create these adorable Christmas cupcakes tree, just a few simple ingredients that turn everyday treats into festive holiday desserts.
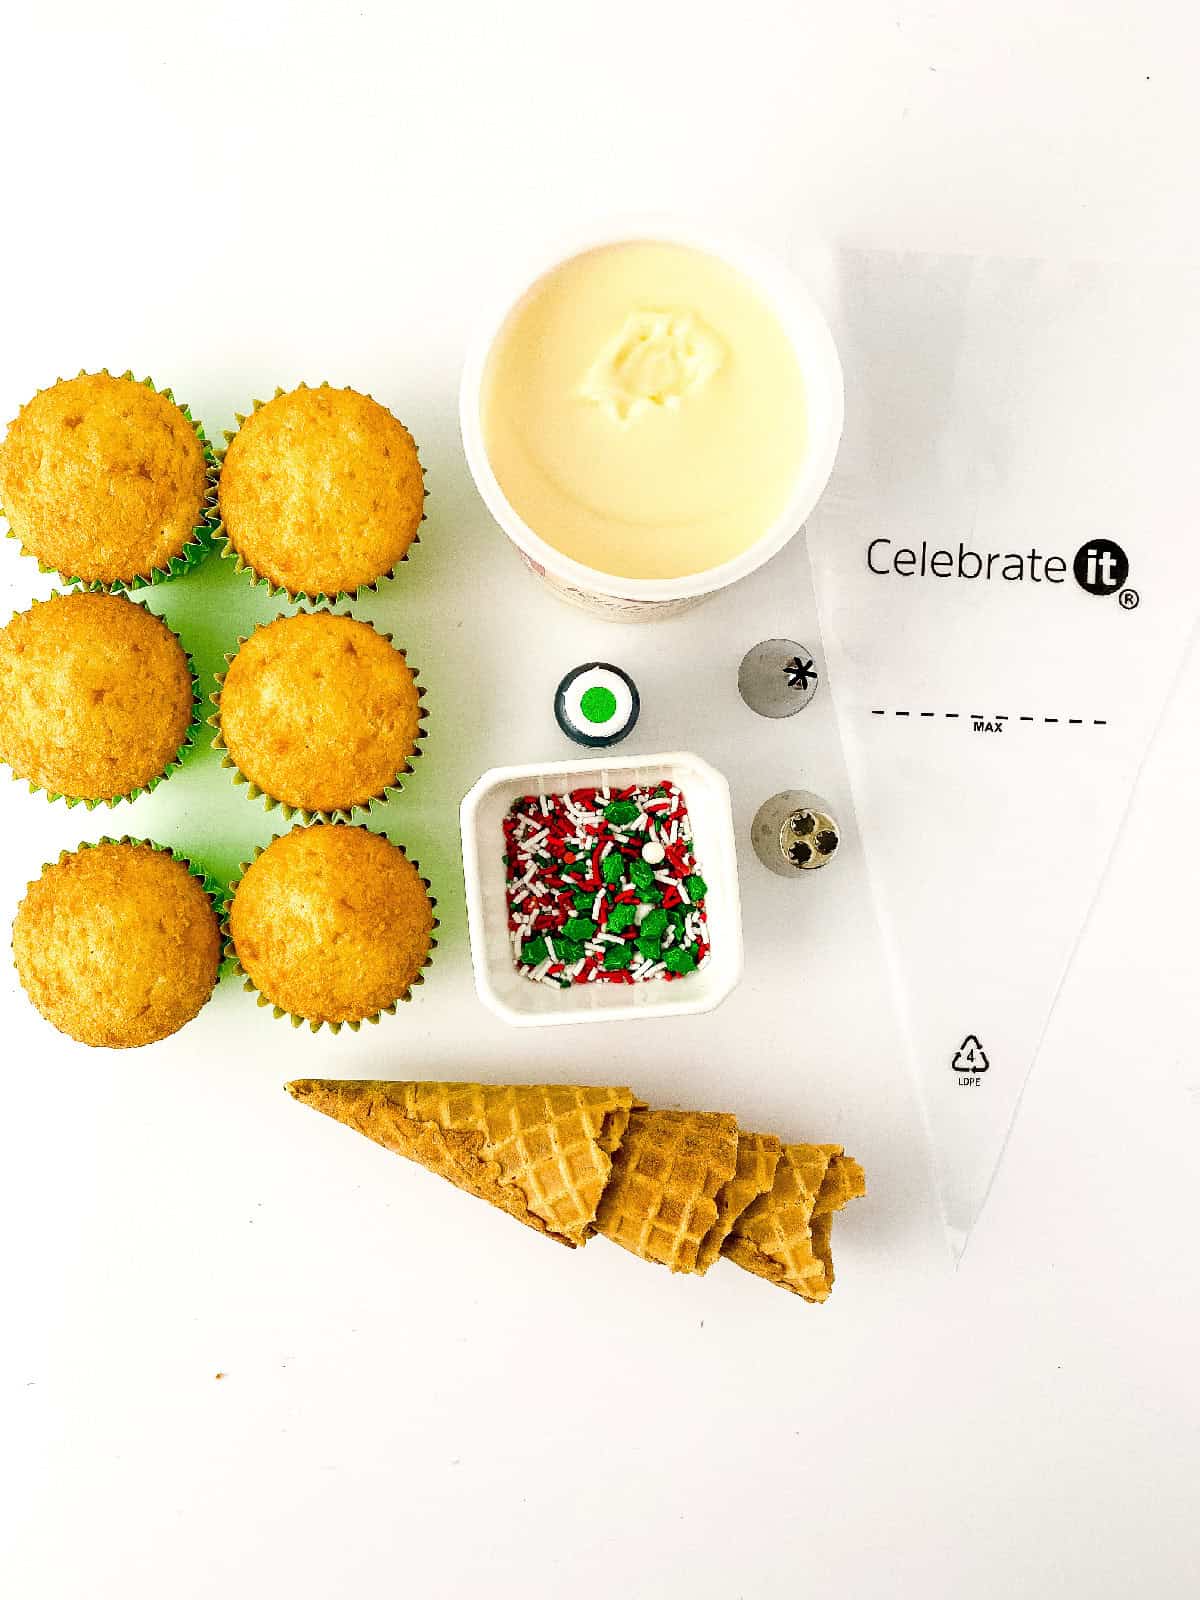
Prebaked cupcakes: Start with your favorite cupcakes, whether homemade or store-bought. Classic vanilla or rich chocolate both make a perfect base.
Vanilla frosting: Smooth and creamy, this frosting is ideal for tinting green and piping into fluffy Christmas tree shapes.
Green food coloring: Just a few drops will transform plain frosting into a vibrant, festive evergreen color.
Sprinkles: These add the perfect pop of color and sparkle, just like ornaments on a Christmas tree.
Waffle cones: Flip them upside down to create the tree shape. This fun little trick instantly turns a regular cupcake into a fun Christmas tree cupcakes with ice cream cone design.
Step-by-Step Instructions for Making Christmas Tree Cupcakes
Making these festive cupcakes is easier than it looks, and with a few simple steps, you’ll have the cutest holiday treats ready to impress your family and friends. This method also works perfectly for Christmas tree ice cream cone cupcakes.
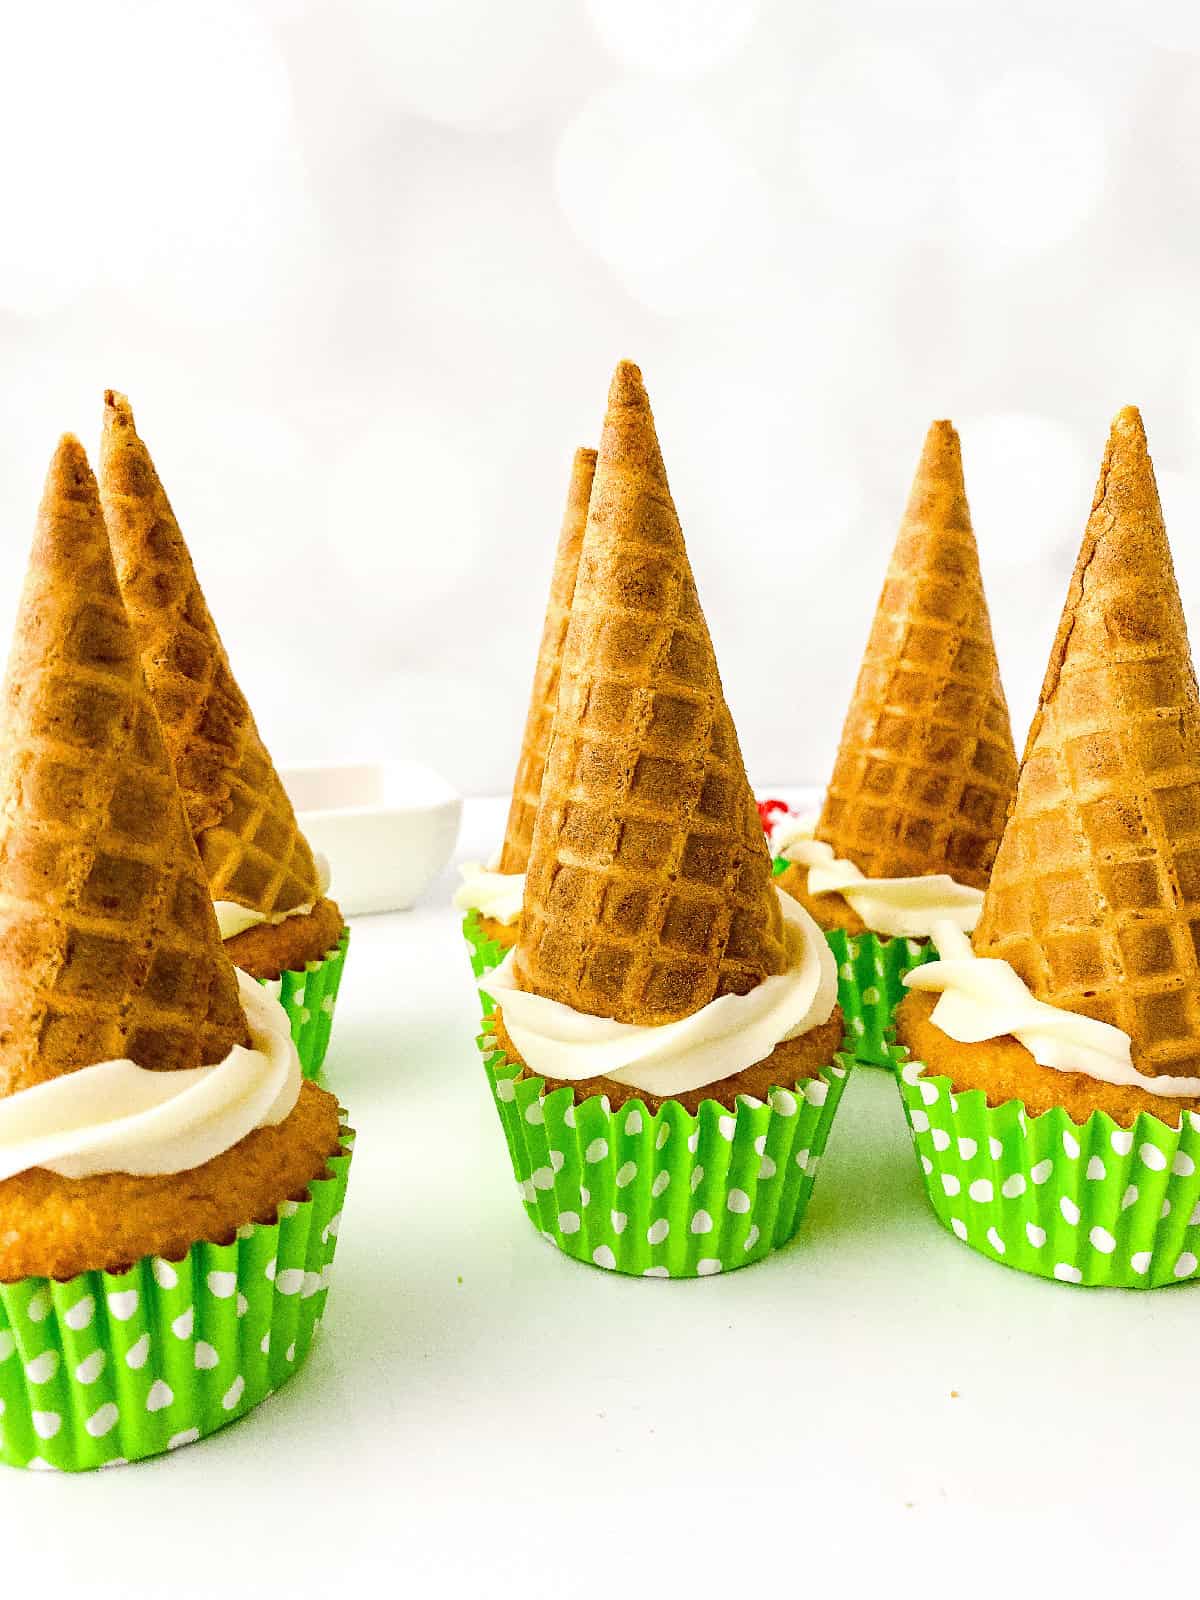
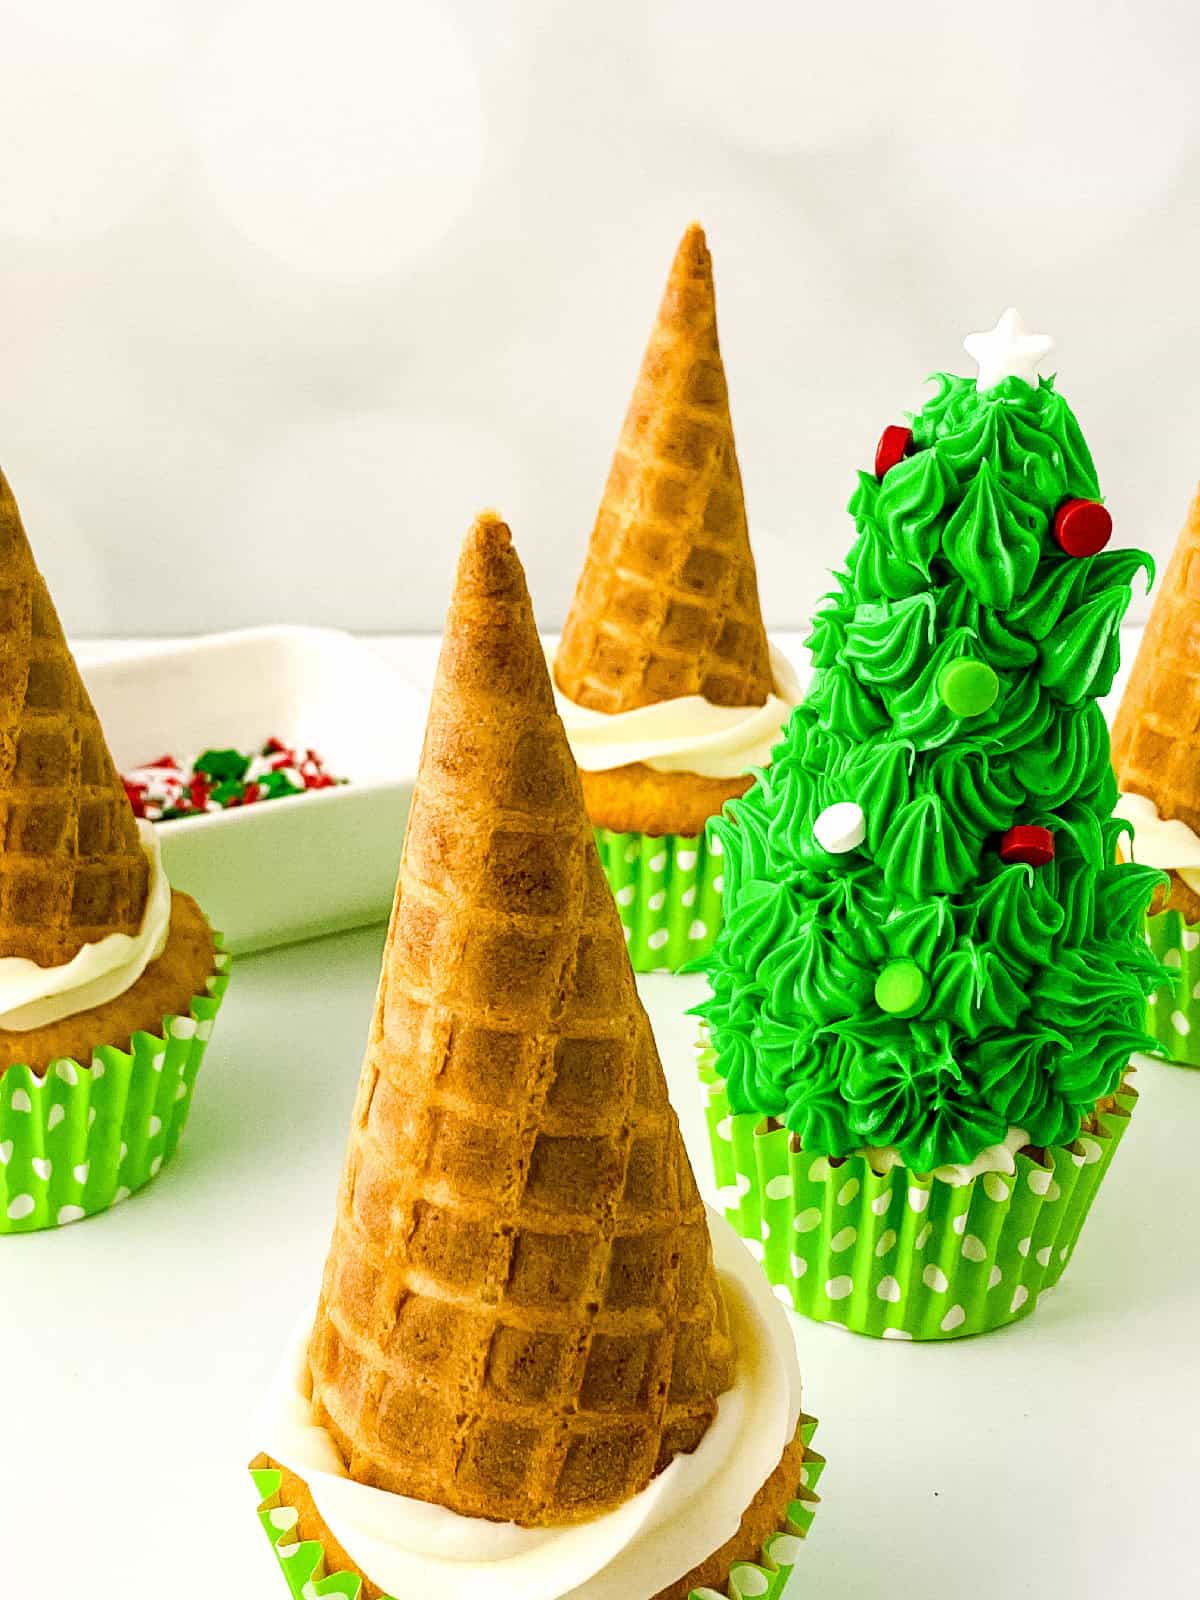
Cut the ice cream cones: Using a serrated knife, carefully and slowly trim the waffle cones down to your preferred size using a gentle sawing motion without pressing too hard, rotating the cone as you cut to get a cleaner edge. Don’t worry if it’s not perfect, you can smooth things out later with frosting.
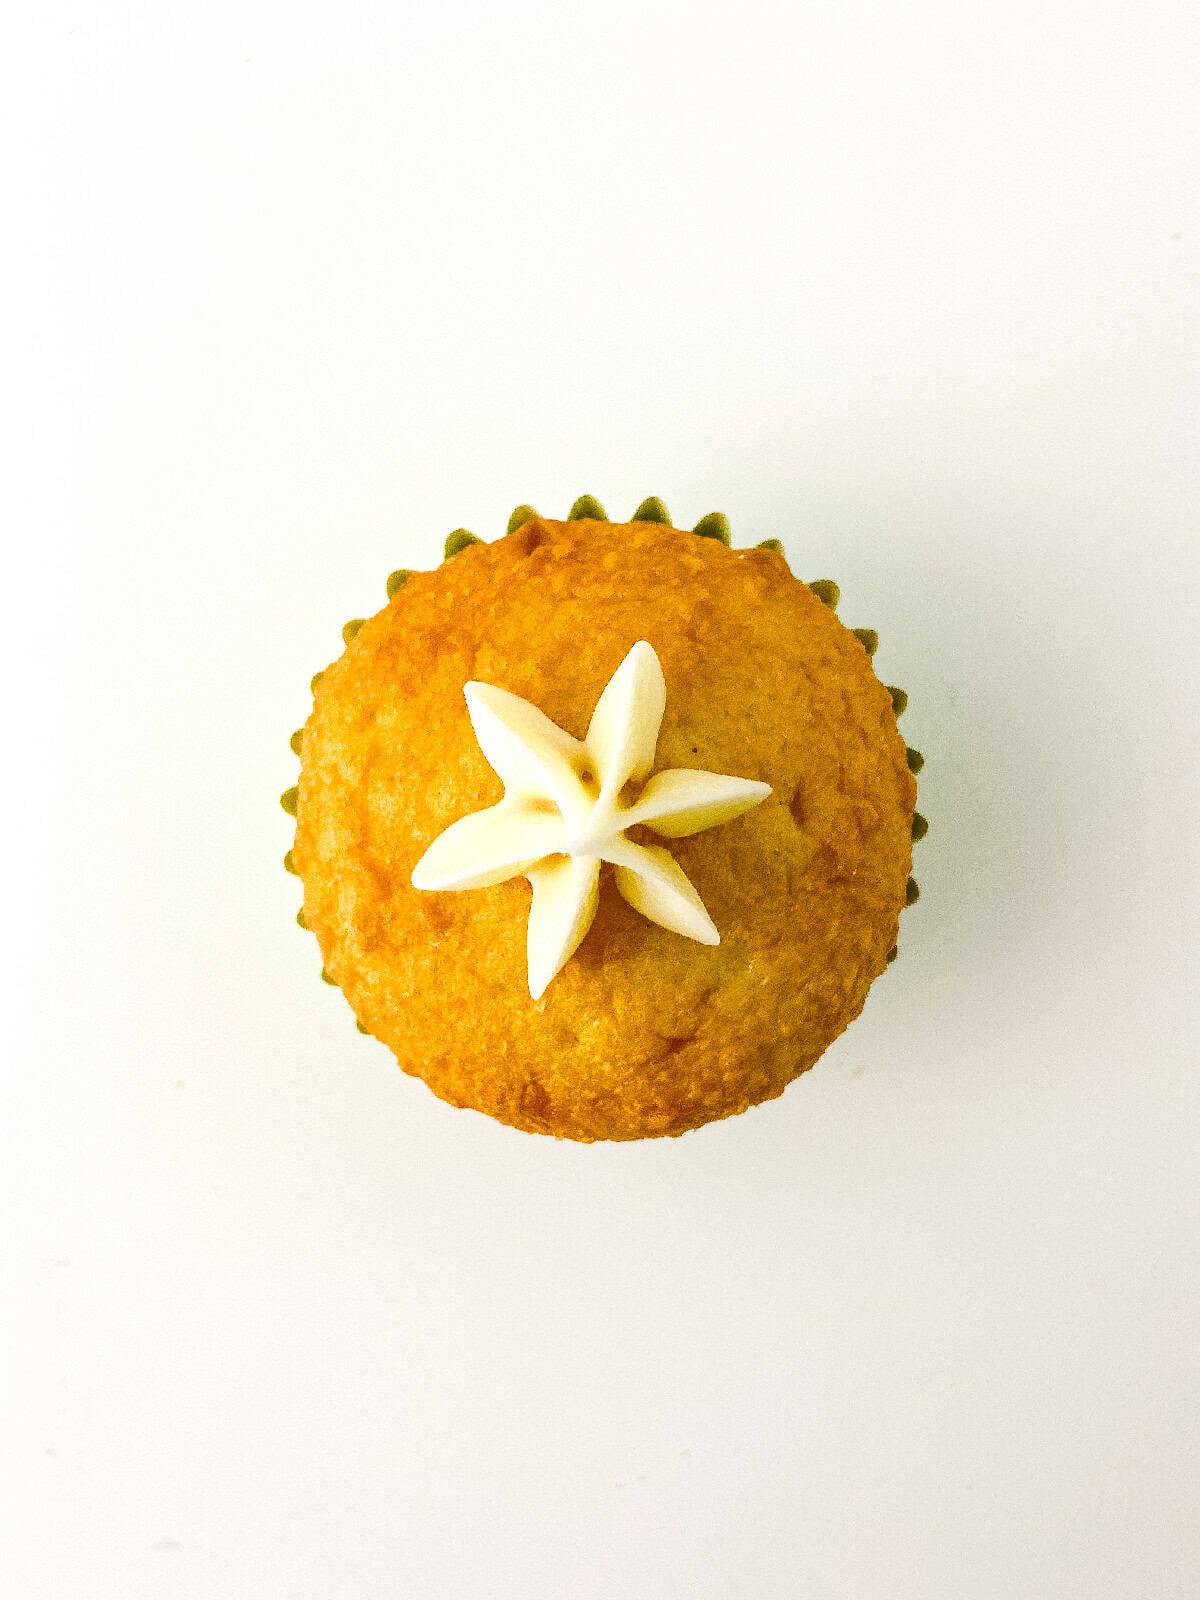
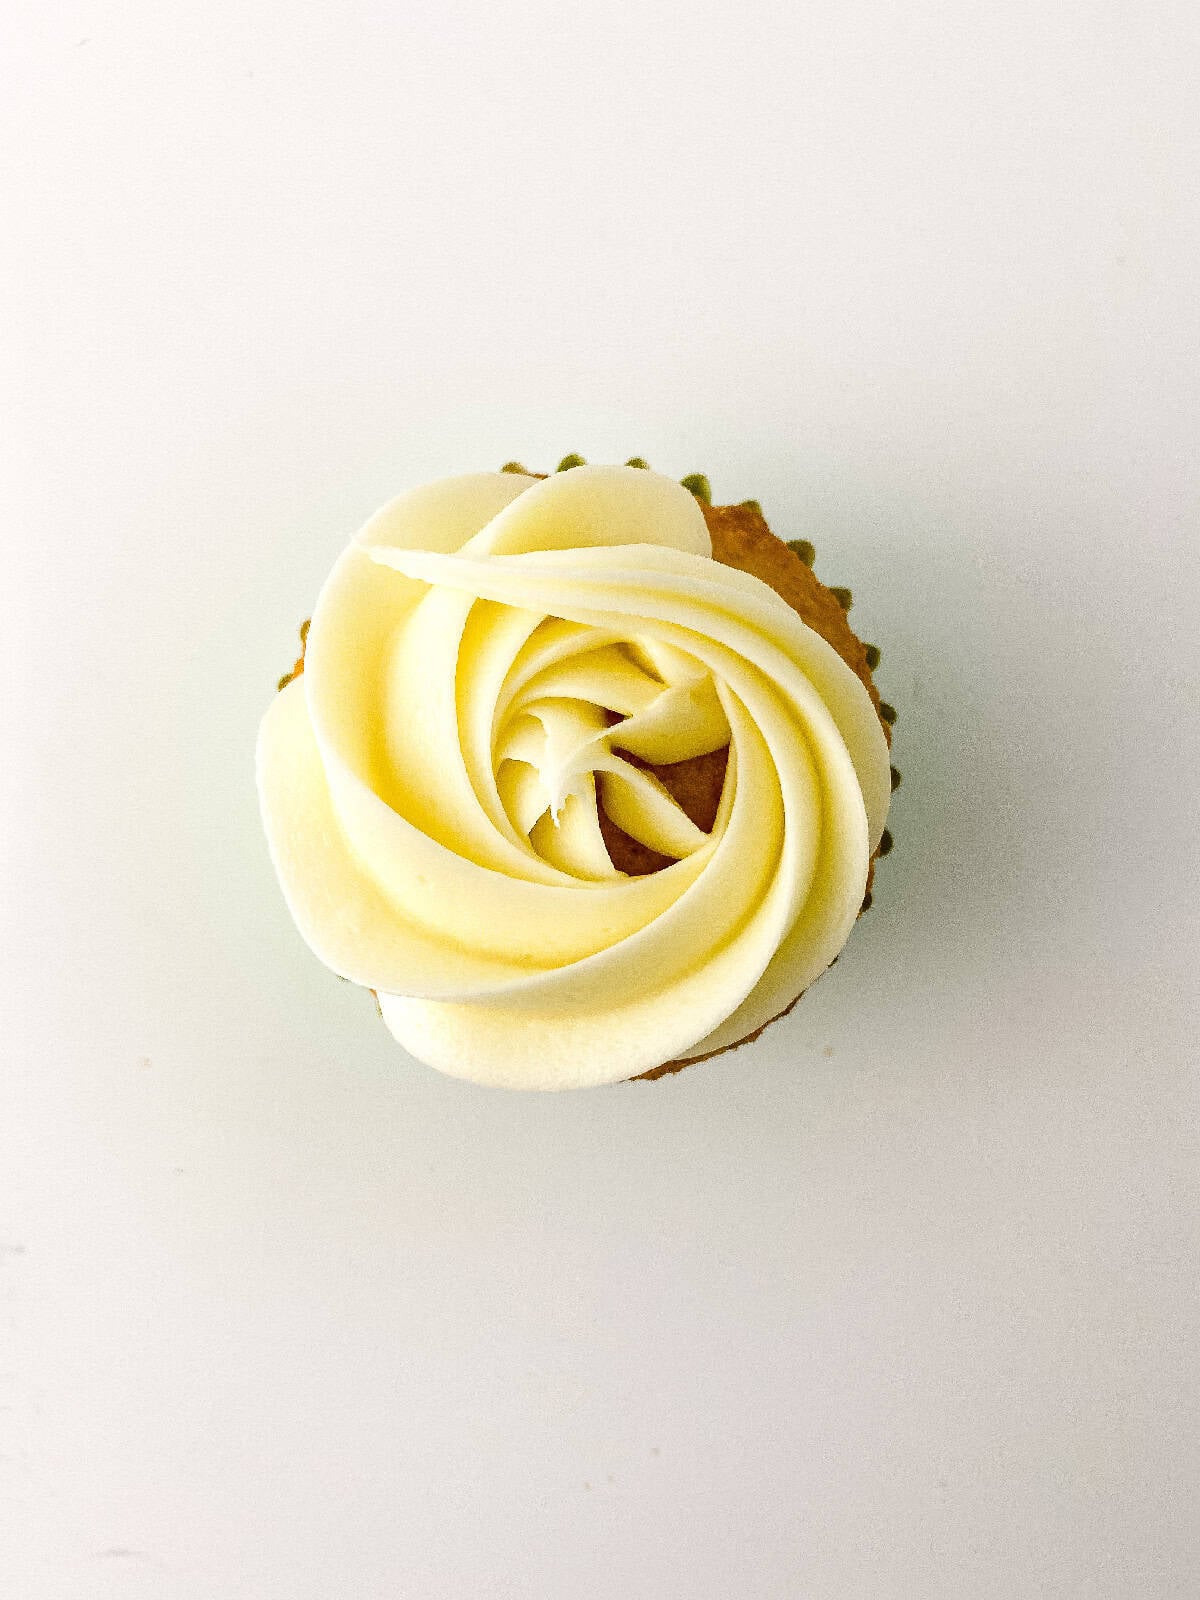
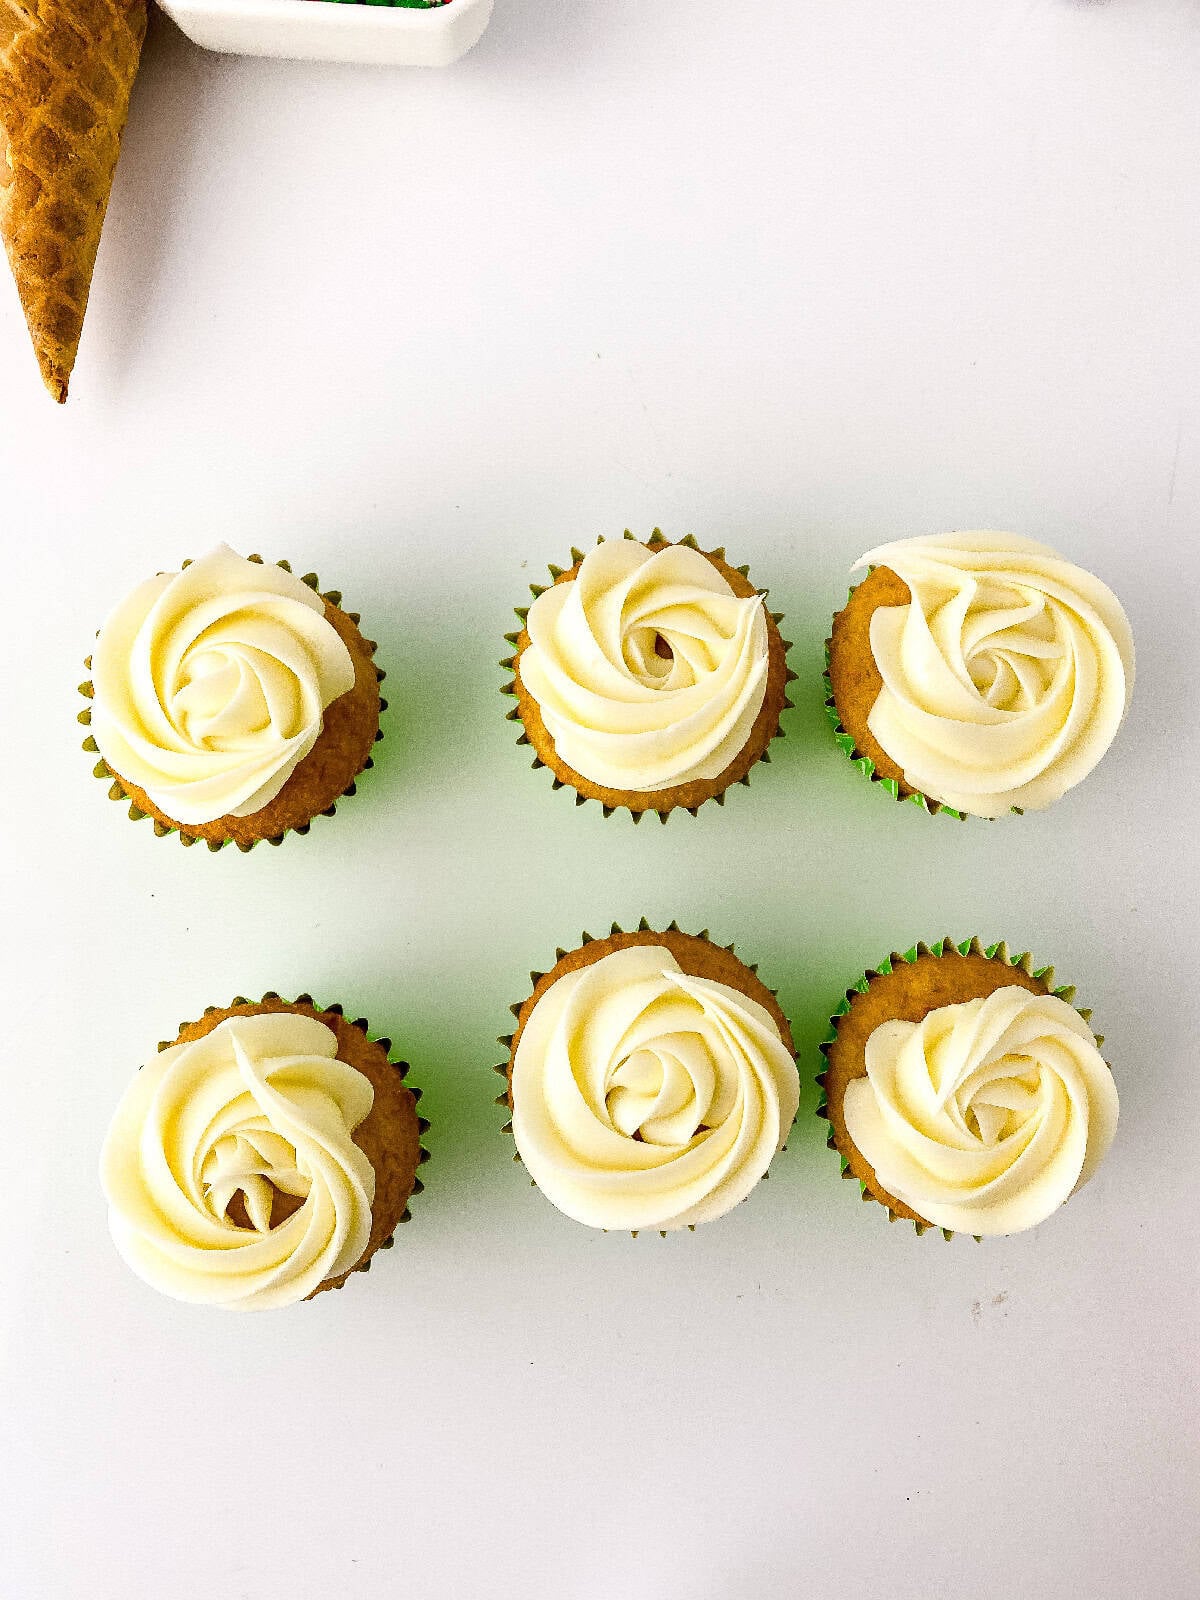
Pipe the frosting base: Spoon about ½ cup of white frosting into a piping bag fitted with a 1M tip. Start in the center of each cupcake and pipe a small star. Then, pipe a circle around the star to create a pretty rosette. Keep the pressure steady for smooth, even piping.
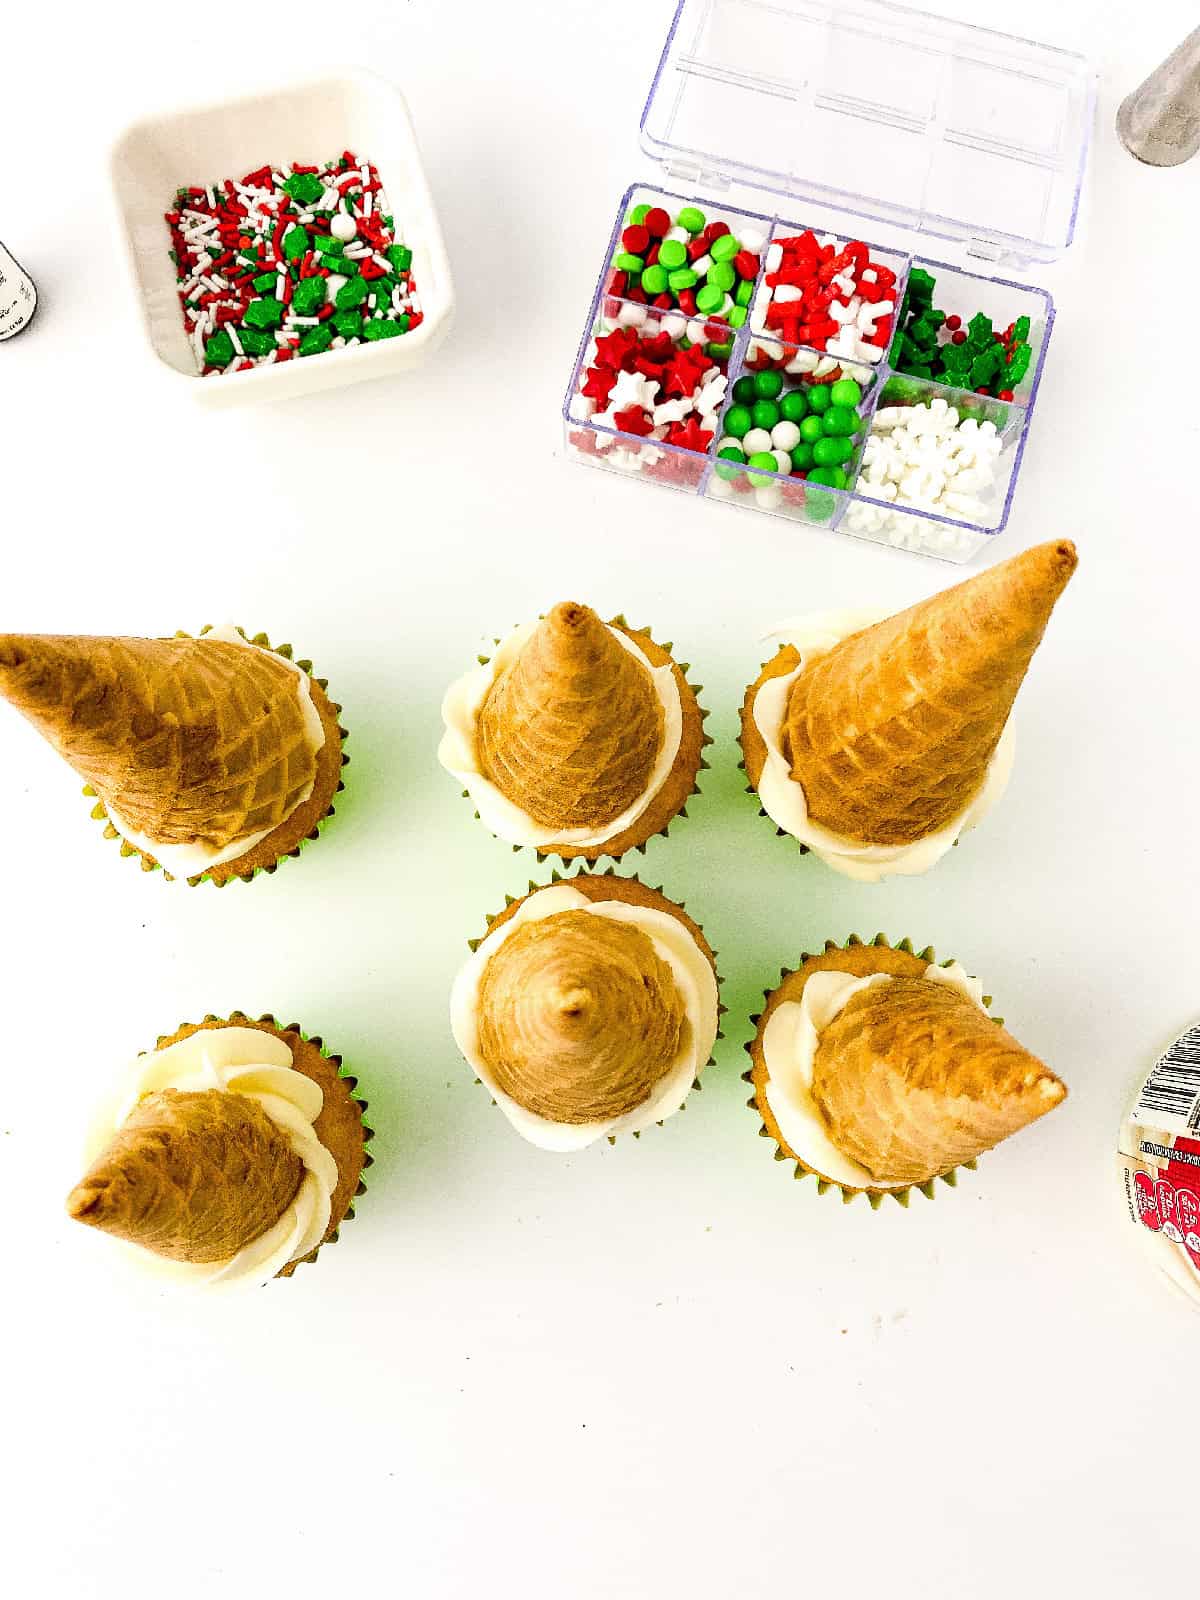
Place the cones: Gently press each trimmed cone into the center of the frosting. Make sure it stands up straight; if it leans, add a little extra frosting to one side to balance it out.
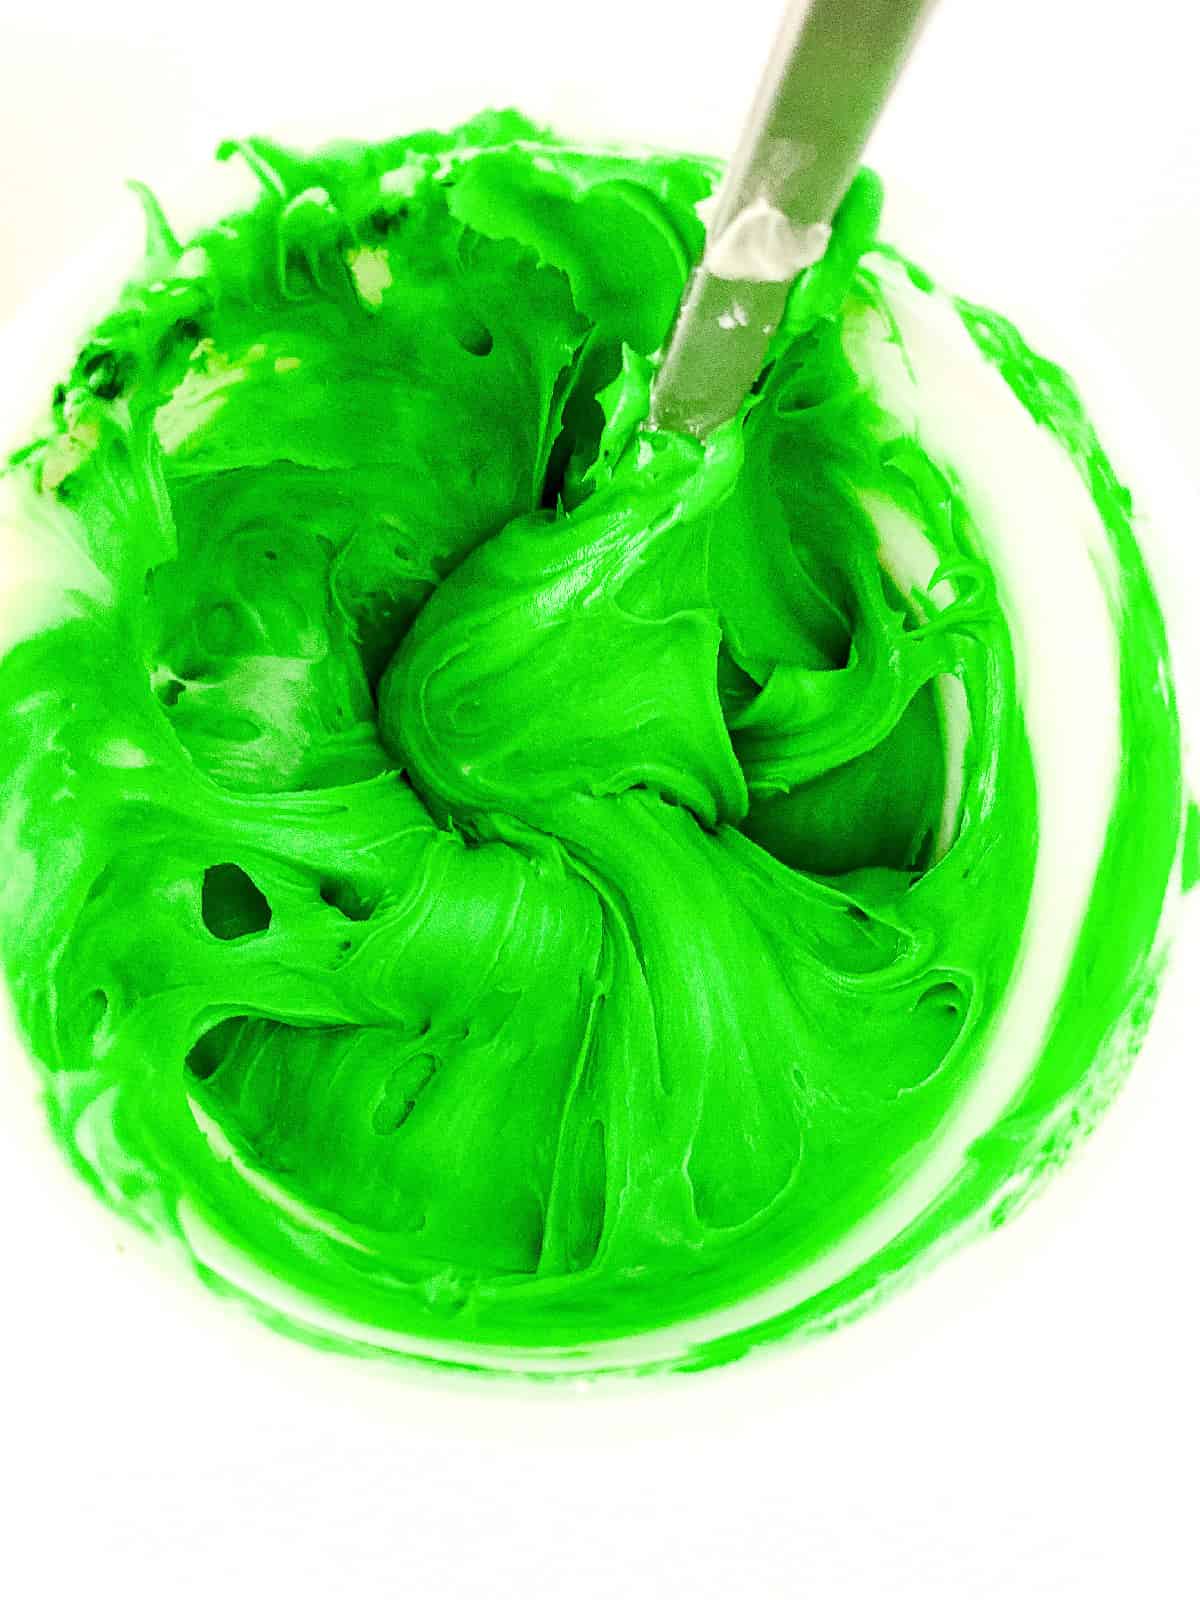
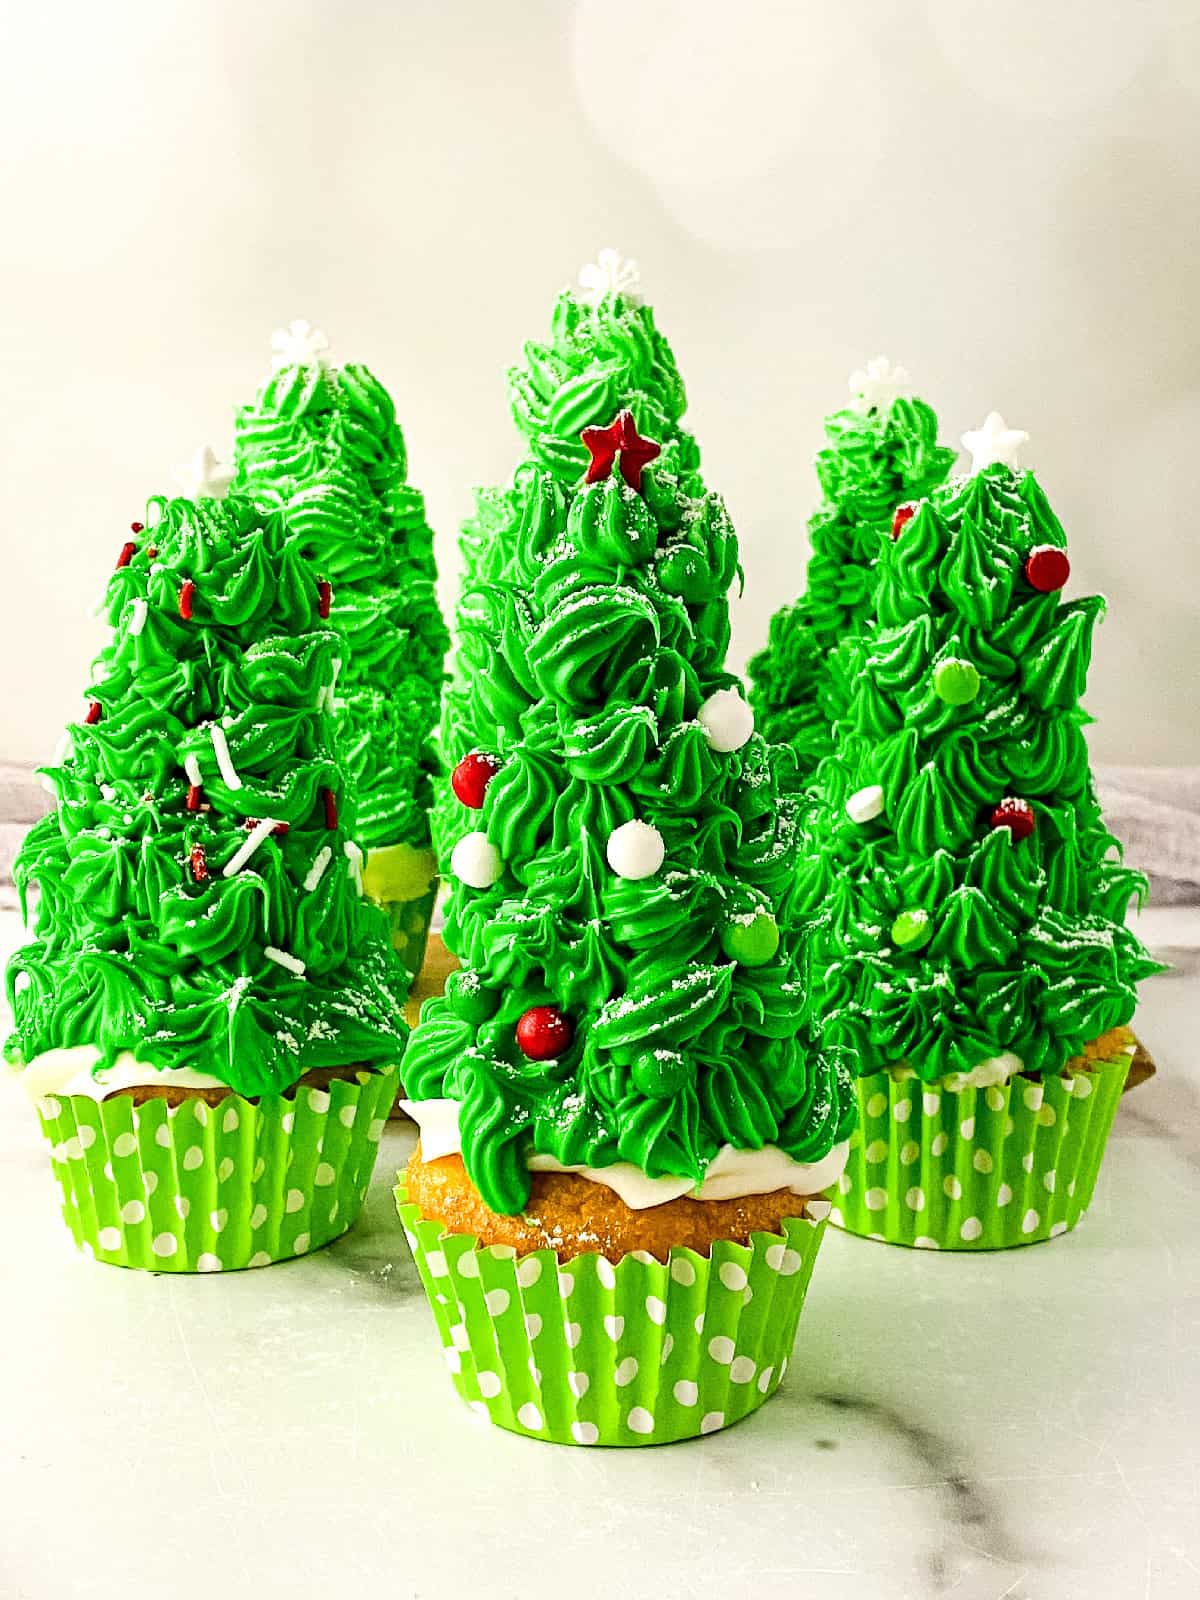
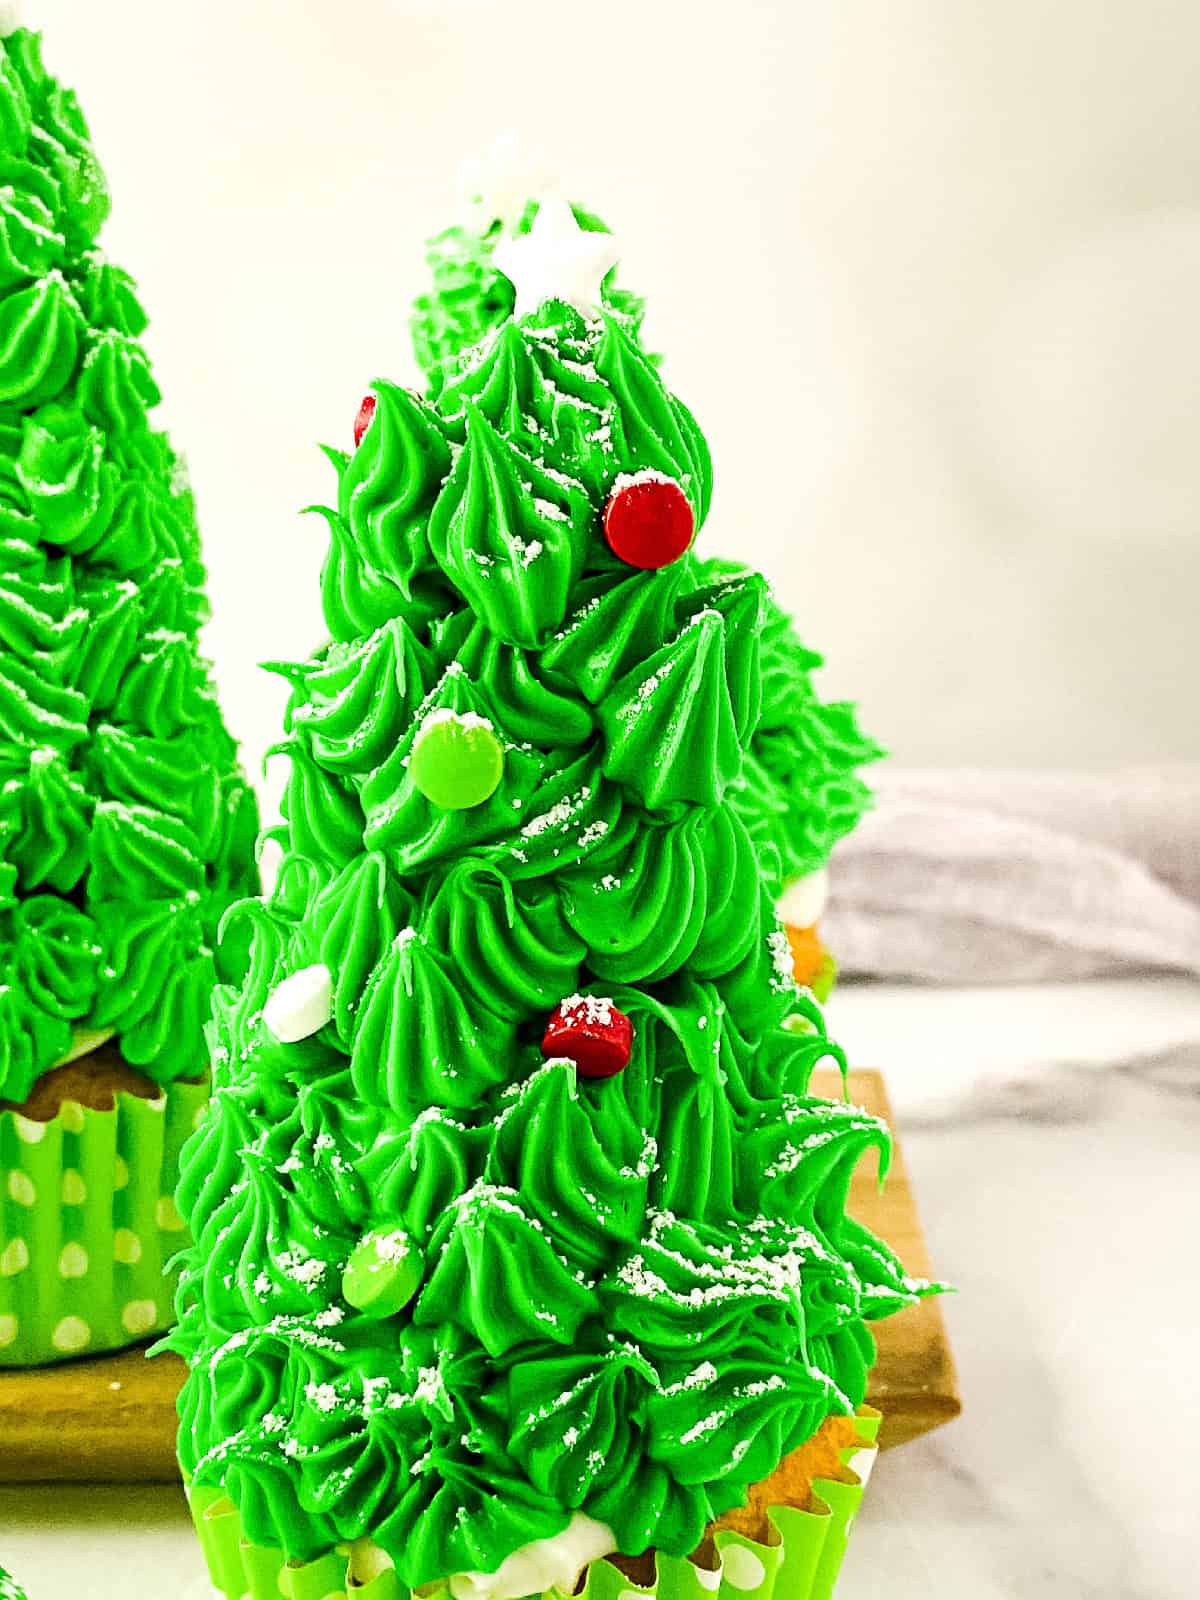
Tint and pipe the green frosting: Dye the remaining frosting green, then transfer it to a piping bag fitted with a small star tip. Starting at the bottom of the cone, piping small stars all the way up to create the look of a Christmas tree cupcake tree.
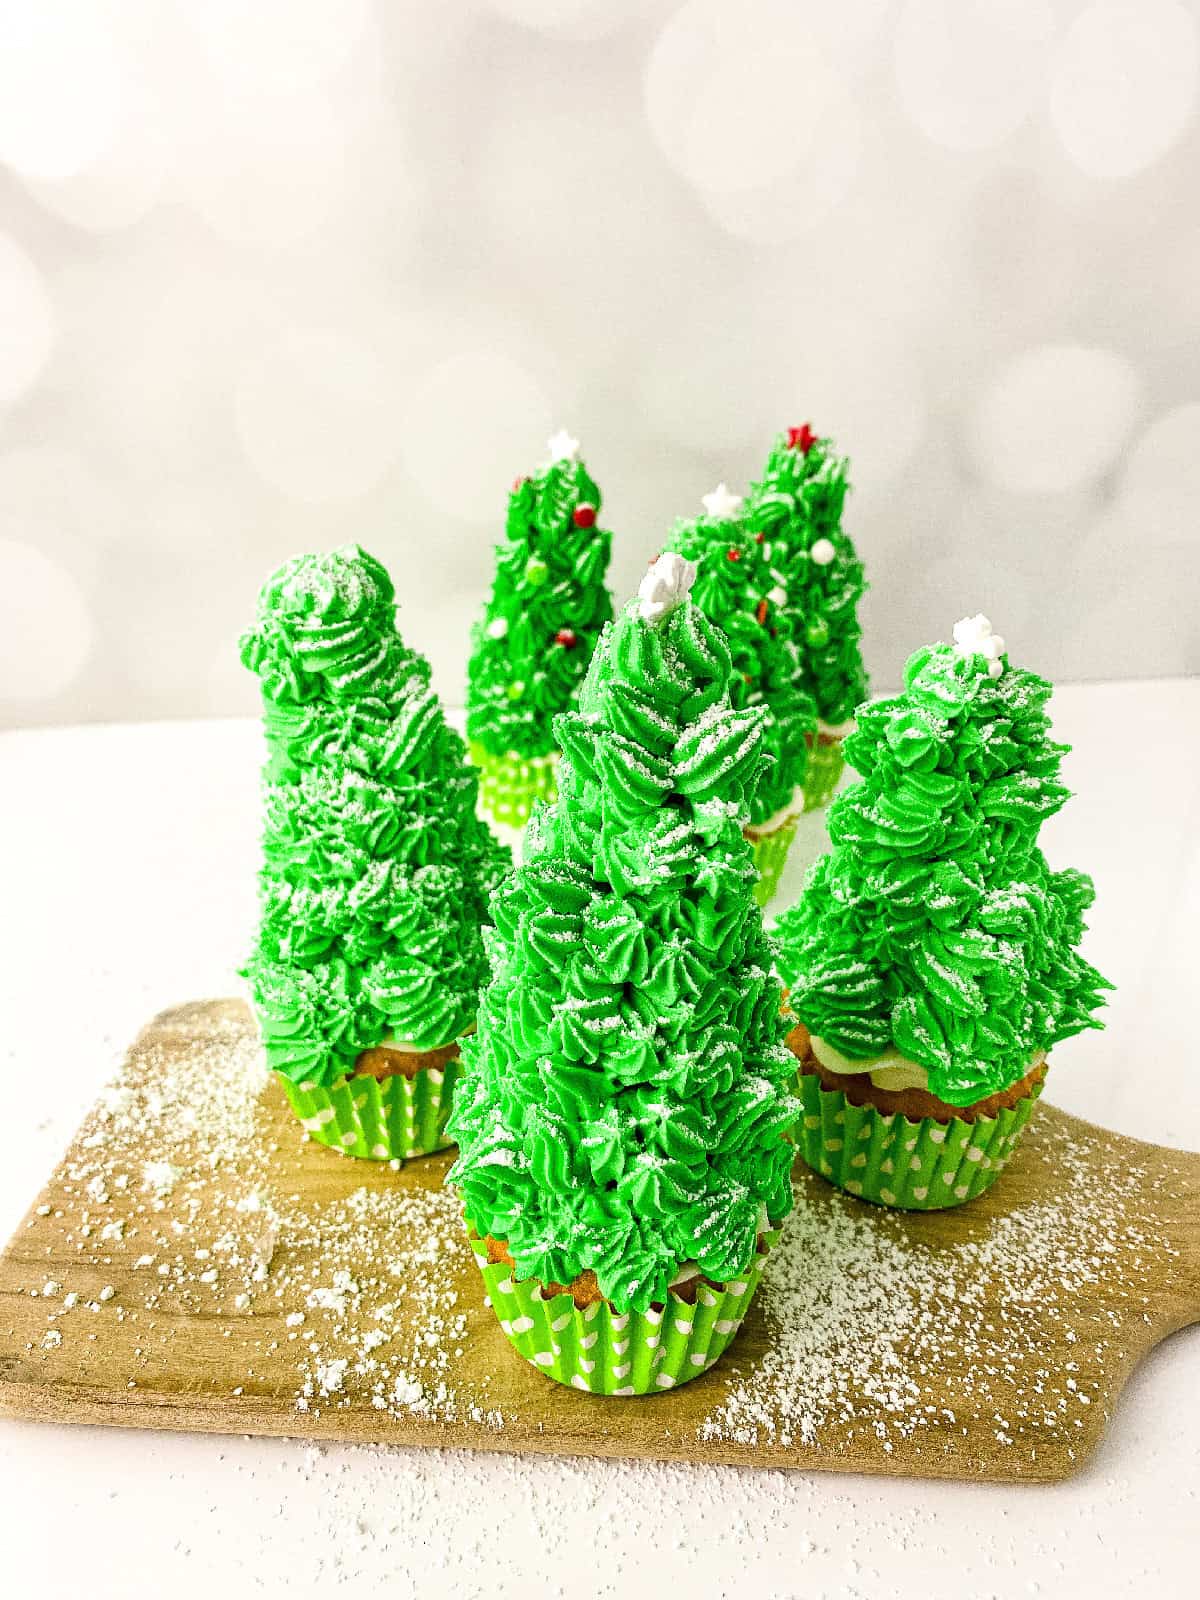
Decorate the tree and serve: Finish your trees with sprinkles, edible glitter, or a light dusting of powdered sugar. This final touch adds a festive sparkle that makes your cupcakes truly shine. Serve and enjoy!
Pro Tips for Perfect Christmas Tree Cupcakes
A few little tricks can make all the difference when it comes to creating cupcakes that look as good as they taste.
For a bakery-style finish, chill your cupcakes for about 15 minutes before piping the frosting. Cold cones hold their shape better and make it easier to control your buttercream frosting. If you want an extra pop of flavor, mix a bit of peppermint or almond extract into your frosting; it pairs beautifully with the vanilla and gives that classic holiday taste.
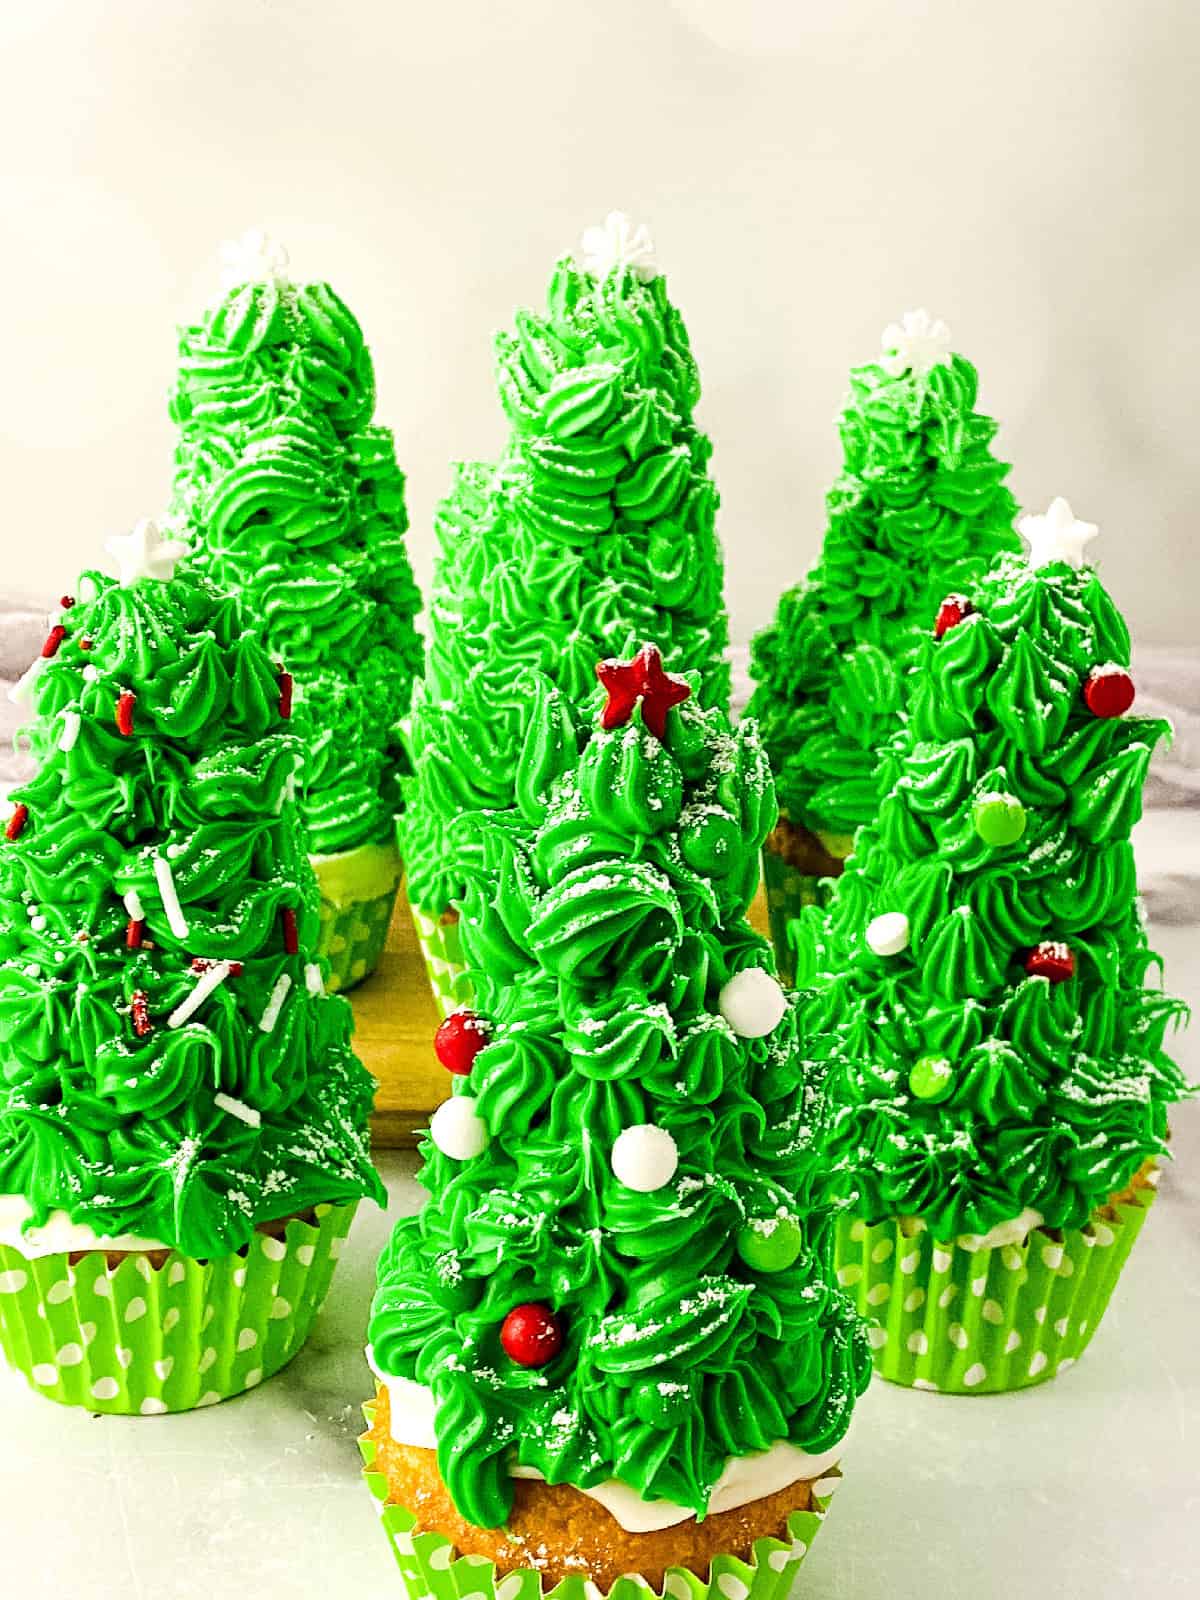
If you prefer a touch of shimmer, dust your finished easy Christmas tree cupcakes with edible glitter or powdered sugar “snow.” These little details make your easy Christmas tree cupcakes look even more magical. You can also use different colored frostings, white for snowy trees, or pastel green for a modern holiday vibe.
Storing and Reheating Tips for Christmas Tree Cupcakes
Keep your Christmas cupcakes in an airtight container at room temperature for up to two days. If you’re making them ahead of time for a party, you can store them in the fridge for three to four days. Just bring them to room temperature before serving so the buttercream frosting softens again and tastes creamy. Avoid stacking the cupcakes; their delicate decorations can easily smudge.
These cupcakes aren’t meant to be reheated, but if your cake base feels a bit firm after refrigeration, leave them out for 30 minutes. The frosting will return to its soft, whipped texture, and the cake will taste freshly baked again.

Fun Variations for Christmas Tree Cupcakes
Christmas tree cupcakes ideas are endless and fun to experiment with.
You can change the cupcake base to red velvet, chocolate peppermint, or gingerbread for extra festive flavor. Add sparkle with edible glitter, candy stars, or crushed peppermint.
For a softer, snowy look, swap the buttercream for whipped frosting. A few simple tweaks can make each batch feel special and give your Christmas tree cupcakes recipe a unique twist every time you make them.
Perfect Pairing Dishes for Christmas Tree Cupcakes
These cupcakes pair perfectly with cozy holiday treats and drinks.
You can serve them with hot cocoa, peppermint lattes, or pumpkin spice coffee for a warm and festive touch. They also go well with cookies, chocolate pretzels, or a sweet snack mix, making them a beautiful and delicious addition to any dessert table.
Final Thoughts
Christmas Tree Cupcakes are more than just a sweet treat; they’re a fun and festive way to bring a little extra holiday magic to the table.
With their soft cake base, creamy frosting, and cheerful decorations, they’re sure to be a hit at parties, family gatherings, or cozy nights at home. Whether you keep the decorations simple or go all out, these cupcakes are such a fun and festive way to celebrate the season. They’re easy to make, a joy to decorate, and guaranteed to bring a smile with every bite.
If you’ve been searching for a Christmas tree cupcakes recipe, this one is both simple and stunning.
FAQ
Absolutely! This recipe works beautifully with either homemade or store-bought cupcakes. Vanilla and chocolate are both great options for Christmas tree cupcakes. If you make your own, just make sure they’re fully cooled before decorating.
No, you don’t! While a piping bag gives a clean tree shape, you can use a small offset spatula, the back of a spoon, or even a zip-top bag with the corner cut off. It’s all about having fun while decorating your tree cupcake.
The trick is to add the cones shortly before serving. If you need to store them, keep the cupcakes in a cool, dry place. Avoid sealing them in a warm or humid container, as this can make the cones lose their crunch.
Buttercream frosting is ideal because it holds its shape well and pipes smoothly. You can use store-bought vanilla frosting tinted green, or make your own buttercream with butter, powdered sugar, cream, and vanilla.
Yes, mini versions are perfect for parties and dessert platters. Just use smaller cones and adjust the frosting amount. They look adorable and are easy to serve as bite-sized treats.

Easy Christmas Tree Cupcakes to Brighten Holidays
Ingredients
- 6 Prebaked cupcakes
- 2 cans Store-bought vanilla frosting
- a few drops Green food coloring
- Sprinkles
- Ice Cream Cones waffle cones
Instructions
- Cut the ice cream cones: Using a serrated knife, carefully and slowly trim the waffle cones down to your preferred size using a gentle sawing motion without pressing too hard, rotating the cone as you cut to get a cleaner edge. Don’t worry if it’s not perfect, you can smooth things out later with frosting.
- Pipe the frosting base: Spoon about ½ cup of white frosting into a piping bag fitted with a 1M tip. Start in the center of each cupcake and pipe a small star. Then, pipe a circle around the star to create a pretty rosette. Keep the pressure steady for smooth, even piping.
- Place the cones: Gently press each trimmed cone into the center of the frosting. Make sure it stands up straight; if it leans, add a little extra frosting to one side to balance it out.
- Tint and pipe the green frosting: Dye the remaining frosting green, then transfer it to a piping bag fitted with a small star tip. Starting at the bottom of the cone, piping small stars all the way up to create the look of a Christmas tree cupcake tree.
- Decorate the tree and serve: Finish your trees with sprinkles, edible glitter, or a light dusting of powdered sugar. This final touch adds a festive sparkle that makes your cupcakes truly shine. Serve and enjoy!